Tuesday, July 30, 2013

A Round Array

I got this set (a round array) awhile ago when the promotion was on and I will admit it had sat on my stamp shelf ever since...oops. But it is seriously so cute and there is a coordinating 3/4" scallop circle punch too. I made this card with a lovely colour combo and some Washi Tape of course.
 
 
Ingredients
Stamps: A Round Array
Ink: Calypso Coral, Pool Party
Paper: Whisper White, Crumb Cake, Pool Party
Accessories: Epic Day washi tape, calypso coral baker's twine, pool party ruffled ribbn, honeycomb embossing folder, 3/4" scallop circle punch


Here is a little closer up look at the washi tape. I folded it back on itself to get the pleated look and since it is sticky like tape, there was no adhesive needed. The nice thing about Washi Tape is it's ability to reposition (because trust me, I messed that puppy up quite a few times). Also it is thin enough that you don't need scissors to cut it, just rip with your fingers.
 
I am seriously in love with washi tape. So glad Stampin' Up! has come out with even more in the holiday catalogue, because I will be honest I have gotten it else where, but now I don't need to anymore. Stay tuned for my upcoming post on all the awesome things you can do with washi tape.
 
Happy Stamping,
Elizabeth Emma


Monday, July 29, 2013

Christmas in July

I hope everyone had a fantastic weekend! On Wednesday we had a team meeting at my Upline, Carolyn's, house. It was fantastic as always. We had a shoebox swap and all went home with some really cute cards which I will share with you later this week. And Angie made pie with raspberries from her garden...delicious!

What is a shoebox swap you ask? A shoebox swap is when you design a card and then make up enough "packages" (like I do for card class) for everyone who is attending. You put everything (paper, ink, punches, stamps, embellishments, etc) in a box (doesn't have to be a shoebox, any box will do) and then you swap boxes and the party until you have made one of everyone's cards.

Lots of fun! Anyways here is a look at the card I made for the swap! And **sneak peak alert**. I used some products from the upcoming holiday catalogue! I am in love with the holiday catalogue, so many fun things for Christmas and Thanksgiving and Halloween. It goes live and you will be able to order from it August 1st.

 
Sorry the quality is not the greatest. It was late and I wanted a photo before I packaged it up. The colours I used were Cherry Cobbler and Old Olive. The stamp and paper and embossing folder are from the new catalogue. I will share details once the catalogue goes live on August 1st.
 
Happy Stamping.
Elizabeth Emma

Friday, July 26, 2013

Wedding Day Butterflies

Happy Friday Everyone! I am here with another wedding card today. A friend of mine (different friend) requested a wedding card but wasn't sure of the colour scheme. I went with a simple basic black and very vanilla. I really like how it turned out.


Ingredients
Stamps: Teeny Tiny Wishes
Ink: Basic Black
Paper: Very Vanilla, Basic Black, First Edition DSP
Accessories: Flower Garden embossing folder, Elegant Butterfly punch, Bitty Butterfly punch, pearls, Chantilly lace ribbon


Happy Friday everyone! I hope you all have a wonderful weekend! I have lots of plans to visit family and hang out with my two main men!
 
Happy Stamping,
Elizabeth Emma

Thursday, July 25, 2013

Mr. & Mrs.

A little while ago a friend of mine requested a vintage themed wedding card for her niece and nephew that were getting married. I was so excited, love anything with a little vintage touch! This is what I came up with ....
 
 
Ingredients
Stamps: Mr. & Mrs. (retired)
Ink: Soft Suede, Primrose Petals
Paper: Very Vanilla, Soft Suede, First Edition Designer Series Paper
Accessories: Honeycomb Embossing Folder, Delicate Doilies, Pearls, Apothecary Accents Framelits, Chantilly Lace Ribbon


Isn't it darling? I had so much fun making it and I hope the bride and groom had an amazing wedding and very happy life together!
 
Happy Stamping,
Elizabeth Emma

Wednesday, July 24, 2013

Birthday Invites!

The more I use MDS the less scared I am of it and the more I love it! I decided to use it for Gabe's birthday invitations and based the entire party off the colour scheme from the invitations. It was so much fun and I even make thank-you notes to match the invites (which I will share later since not everyone has received them yet).


Aren't they fun? They were so easy to create and with the click of a few buttons, Stampin' Up! prints them and sends them straight to your house with envelopes too! Perfect! One less thing I had to worry about for the party.
 
Don't have MDS yet? Download the 1 month free trial to get started! I guarantee you will be hooked and then you can purchase the download from my online store. You don't even need to wait to have it shipped to you. How perfect is that?
 
Still not convinced? What if I told you Stampin' Up! comes out with brand new downloads every week? Yes, every single week! That is probably my favourite part! Oh, and the fact that they are downloads so NO SHIPPING. Seriously, it doesn't get much better than this!
 
And like every Stampin' Up! product everything coordinates. The colours available in MDS match those that are available on paper too, so you can do some designing on the computer, have it printed (by Stampin' Up! or on your home computer) and add your own touch of ribbons, buttons, or other embellishments. The possibilities are honestly endless.
 
Happy Stamping,
Elizabeth Emma

Tuesday, July 23, 2013

Undefined - Stamp Carving Kit


Have you ever wanted a stamp but couldn't find the perfect image? Maybe you have a special family logo or a sketch you'd like to have as a stamp. Well now you can! Undefined is Stampin' Up!'s new stamp carving product line. You define the rubber stamp any way you want.

When you carve your very own stamp, you have will have an entirely new and different creative experience. And when you're finished, you will have created a one-of-a-kind stamp!

How exactly do you carve a stamp? Watch the video for a tutorial


Intrigued? I know you want to get your hands on the kit and start carving your own masterpieces.

Included in the Stamp Carving Kit ($25.95):
  • 2 carving tools
  • 3" x 4" rubber
  • 3" x 4" foam
  • 4 wood blocks (various sizes)
  • 1 Island Indigo Stampin' Write Marker
  • 3 postcards
  • Instruction sheet
  • Stamp image templates


Included in the Refill Kit ($12.95):
  • 3" x 4" rubber
  • 3" x 4" foam
  • 4 wood blocks (various sizes)
  • Instruction sheet


What's that? You would like your stamps to be clear mount instead of wood mount? Easy. Purchase the clear-mount cling foam to make your clear mount stamps.


Check out this flyer with all the information you need.

Happy Stamping,
Elizabeth Emma

Moasaic Madess

I haven't been sharing too much recently, and most it is because I haven't hardly had time to stamp! Life with a one year (and going back to work) is crazy busy! I am trying to dedicate some time though and am hoping to update more frequently.
 
One of the sets I got during my preorder (yes, you know how long ago that was...let's not even talk about it) was the Mosaic Madness set. I am having lots of fun with it and finding it very versatile.


Another thing I am loving...the new in colours! Aren't they gorgeous!? And they have the best names, they make me so hungry!
 
Ingredients
Stamps: Mosaic Madness, Hey There Friend (Paper Pumpkin set, sign up here if you have not done so already)
Ink: Crisp Cantaloupe, Strawberry Slush, Pistachio Pudding, Costal Cabana, and Baked Brown Sugar
Paper: All of the in colours mentioned above, and whisper white
Accessories: Mosaic Punch and Rhinestones

 
Here is a close up. Super simple but still very cute and an easy way to show case the new colours.

 
All packaged up and ready to give-away! Yes I am going to give this lovely little set of cards (and I will include envelopes) away to one lucky blog reader or facebook fan! Woo hoo!
 
To enter this contest get your friends to follow my blog or like my Facebook Fan Page.
 
1. Send your friends to my Facebook page and make sure they like the page AND  leave a comment saying you sent them
2. Send your friends to my Blog and get them to follow it and comment on THIS POST to say you sent them

I will leave this contest open until July 31st. This contest is unfortunately for local pick-up/drop off only but I do hope to have more in the future so stay tuned!

Happy Stamping,
Elizabeth Emma

Gabriel's 1st Birthday

I can't believe it! My baby boy is 1! I know I have gotten a little behind in the monthly updates, but he's there, a whole year old.

We had a wonderful party for him (with the help of Stampin' Up! and My Digital Studio of course) and he got spoiled with hugs and kisses, cake, and lots of presents!!

A little bit empy but this was the food table. I traced cookie cutters I had to make the garland using Pool Party, So Saffron, and Basic Grey. I then strung them all onto striped pool party baker's twine.
 
Super cute wooden spoons and forks I got off Etsy. They say "Happy Birthday" and better yet are compostable! And of course I dressed them up with my new favourite accessory...Washi Tape!

Excuse the glare but this is one of the signs I made using My Digital Studio. It was so quick and easy using the "Many Mustaches" set and I was able to coordinate all the colours with the rest of the party (the beauty of Stampin' Up!)
 
 
Drinks!
 
Water bottle labels I made also using My Digital Studio.


"Here mom, try some"
 

The second sign I made using My Digital Studio.


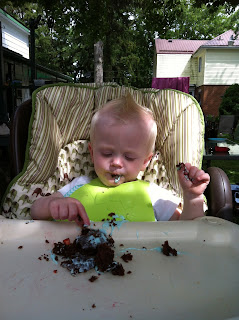
Loving his cake!
 
 
We used mason jars for drinking glasses and I got these super cute paper straws off Etsy. We then used more pool party baker's twin and cardstock (along with so saffron) for the labels so people could write their names down in case they set their drink down and forgot who's was who's. I used the Fancy Label Punch to cut them out.


Hmmmm.....

Fam-Jam!
We rarely get a photo of all three of us together (mostly because I am usually the one taking them) and this one isn't even that great, but at least we have one!

I will share Gabe's birthday invitation (which I made using MDS) on another post.

Happy Stamping,
Elizabeth Emma

Saturday, July 20, 2013

Save on Paper Pumpkin!

 
Still haven't signed up for My Paper Pumpkin? I have a few things to say to you. First...what's the delay? It is a great 30 minute crafting escape delivered straight to your door every month. Second...Join now!
 
From now through August 31st, 2013, new Paper Pumpking subscribers can use the promo code PUMPKINDEAL to join Paper Pumpkin for only $12.50 a month for the first two months!*. 

(I'll let that sink in for awhile . . .)

With a deal as sweet as this, you'll want to sign up now! You will get to enjoy these great savings for two months and then the kits will go back to the regular price ($24.95) for the future kits you receive. To sign up, visit www.mypaperpumpkin.com before August 31st, 2013. Make sure you choose me, Elizabeth Boyne, as your demonstrator to receive a free gift from me just for signing up.

If you have any questions about My Paper Pumpkin or would like to see some of the past kits and projects I have created them, please do not hesitate to contact me!

Happy Stamping,
Elizabeth Emma

*Plus tax, where applicable. Shipping included.

New Thinlits Card Dies


They've been called flip cards, flip flop cards, swing cards, and more-but they have always been a bit tricky to create. Not anymore! Stampin' Up!'s amazing new Thinlits Card Dies cut and score to create a card that flips in just one step.

These new card dies come with extra die pieces that have versatile designs, so you can use them on other projects, not just flip cards. (The Circle Card Thinlits Die comes with 10 total pieces; the Label Card Thinlits Die comes with nine total pieces.)

With the number of dies you're getting, plus the die that creates the card itself, the price is a great value-especially to create an interactive card!

Both of these sets will be Available August 1st for $40.95.

These very impressive "flip" cards would make great announcements, invitations, Christmas cards and everything in between. The main shape in the cards (circle and label) can work with a lot of stamp images from Stampin' Up! so you can create tons of different kinds of cards using many different stamp sets. A few suggestions include:

Label Card Thinlits Die (item 133479):
  • Happy Day Stamp Set (item 130294 W item 130297 C)

Circle Card Thinlits Die (item 133480):
  • Worth the Wait Stamp (item 131094 W)
  • Five-Way Flower Stamp (item 131088 W)

Both card dies pair well with:
  • Oh, Hello Stamp Set (item 131931 W item 130733 C)
  • Yippee-Skippee! Stamp Set (item 131341 W item 131344 C)
  • Really Good Greetings Stamp Set (item 130330 W item 130333 C)
  • Regarding Dahlias Stamp Set (item 130324 W item 130327 C)
  • These dies also work well with our new magnetic platform (item 130658) so you can place the dies exactly where you want them!
If you would like any more information on how these new dies work or if you are interested in ordering a set, visit my contact page and get in touch with me whichever way works best for you! For even more information check out this super informative flyer. I cannot wait to get my hands on these!

Happy Stamping,
Elizabeth Emma

Monday, July 8, 2013

Baby Scrapbook

Awhile ago I mentioned to you faithful readers that I had a baby scrapbook class with a few great ladies! We all made gender neutral baby books using Stampin' Up! supplies and I just love how they came out.

I am not going to share specific ingredients we used for each page as that would take forever but if you have any questions about any of the materials used, please let me know and I would be happy to answer them (be prepared for photo overload). I was conflicted as to whether or not to split the pages into separate posts or leave them together. In the end I opted to leave them together.

Front page with space for birth details.


This set (Fox and Friends) is retired but I just can't get enough of it, I think it makes the cutest baby things.

Grey and yellow is one of my favourite colour combos right now.


This turned out to be my favourite pages I think, you'll see I took a closer up of each page individually.
 
The ink splatter in from a My Paper Pumpkin kit and the words were printed on the computer and cut out with the modern label punch.


I had so much fun making this with the ladies, I hope everyone else did too! I hope to do another scrapbook class come fall. Stay tuned for more details.
 
Happy Stamping,
Elizabeth Emma

Friday, July 5, 2013

Baby Alexis Jade

I am so sorry I have been a terrible blogger lately, I will try to improve, life has just been crazy! Some exciting news! A little while ago my good friend and co-worker from the hospital, Laura, and her husband Steve welcomed a beautiful baby girl into the world! She is such a blessing and Laura and Steve couldn't be happier.

I got the privilege of going to visit yesterday with a couple other great friends and coworkers and we had a great time! Of course I couldn't visit without bringing a little handmade goodness with me.

 
 I just love this card! I got the idea from Pinterest which brought me to this lovely blog. Thanks for all your helpful tips Lisa, at Add Ink and Stamp! Aren't the ruffles to die for?

Ingredients
Stamps: Bitty Banners
Ink: Versamark, Pretty in Pink
Paper: Pretty in Pink, Whisper White
Accessories: Fancy Fan embossing folder, white embossing powder and heat gun, bitty banners framelits die, oval punch, large pearl, delicate doilies, retired ruffled ribbon in blushing bride


I also gifted Laura with a baby scrapbook that we made a couple months back. It is gender neutral but I love how it came out and Laura and Steve did not find out what they were having. I told her she could add some lovely pink touches along the way!

We had such a great time and Alexis is so beautiful! Congratulations to Laura and Steve and the entire Kuiper family!

Happy Stamping,
Elizabeth Emma

Settin' Sail ...


There's a new Photopolymer stamp set in town from Stampin' Up! Settin' Sail is a super cute new photopolymer stamp set that will be so much fun to use, and so versatile! Still haven't heard about photopolymer stamps? Well, get in the loop! Just kidding, but seriously, check out this post to learn a little more about them.

There are so many benefits to photopolymer stamps, you really should check them out!

Happy Stamping,
Elizabeth Emma